Gold $4,408.20 Silver $68.43 Platinum $1,859.00
How to do Stone In Place Casting
How to do Stone In Place Casting
This process produces important benefits such as:
- 1) A diamond setter in gold costs an average of $25-40/hour. A stone in wax setter costs $12-15 per hour.
- 2) Reducing stone breakage to near zero.
- 3) Production time in the setting department is considerably reduced.
- 4) Training people to become stone-in-wax setters takes a fraction of the time it takes to teach someone diamond setting in gold.
- 5) Lower quality diamonds can be used with little fear of breaking them.
- 6) The process also works well for CZ’s, Sapphires, Rubies, and Garnet, as well as diamonds.
If you want to join the manufacturers that are now experiencing these savings there are two factors that must first be focused on:
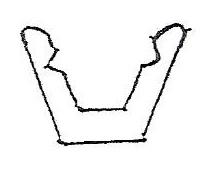
- 1) You must prepare your models in a way that will allow the stones to be held in the wax securely. This means that prongs have to be notched and grooves have to be cut in channel settings to give the stones a place to sit and be held by the wax and supported by the investment during casting.
- 2) You must be prepared to have equipment that will accurately control your burnout temperatures and a casting machine that is capable of accurate metal temperature, a strong vacuum on the flask and preferably pressure on top of the metal. These controls will allow the gold to fill the rings completely without damage to the stones. They will also help to give you porosity free castings.
Your model maker has to carefully allow for the exact amount of shrinkage from the rubber mold to ensure that the stones will properly fit the waxes. If the wax channel is too tight or the space between the prongs is too small the stones will simply not fit. If the channel is too wide then the stones can easily fall out and be lost.
A good model maker should be able to calculate the shrinkage properly, or if not, then you should make your rubber mold using a liquid rubber with 0% shrinkage such as the LMR Liquid Rubber.
When the rubber molds are correctly made and wax patterns produced, the stone-in-wax setter should be able to easily and quickly insert the stones into the wax by gently pressing them down into the setting, spreading the prongs apart and by using a good, flexible wax with memory, the prongs should snugly hold the stones. When channel settings are made correctly, the stones should easily slide into place with gentle pressure. You also must leave a small space between each stone to allow for shrinkage during casting or the stones will chip and break.
Since the correct fit of the stones into the waxes is essential for the success of this process, I recommend that each wax pattern be carefully inspected before they are set up on the tree.
The quality control person that inspects the waxes should also carefully train the wax setters how to pick up the stones, insert them into the wax, show them how to keep the waxes close together in a channel and to set them at the correct angle for alignment. Because every stone is not exactly uniform, some stones may sit slightly higher than others. To correct this, lightly touch the top of the stone with a heated wax tool to warm it up and push it down gently until all the stones are level.
As mentioned, you need a good quality wax that is flexible, has memory and is dark in color so that the prongs can easily be seen in relation to the stones such as our 74-0601 wax. Be sure to clean off any excess wax which may be sitting on top of the stones.
Once the waxes have been properly stone set, they are treed and invested as you normally would.
After investing, the flasks should be allowed to sit on a vibration-free table for one hour and then the rubber base is removed.
Solitaire investment (#Z14-303-BX) was developed to protect the stones during the burnout and if the instructions are carefully followed you shouldn’t experience any problems.
After casting has been completed the flasks are allowed to cool for at least one hour. The flasks should be cool enough to be held in your hand. Only then are you ready to remove the cast tree from the investment. A Strainer should be used when removing the investment to catch any loose stones if the channel or prong setting is not holding the stones tight enough.
After the investment has been removed and the trees are cleaned, the pieces are cut off in the normal fashion. The cut off pieces are quality checked to determine whether stones are loose and need tightening.
Stripping and bombing is to be avoided. These processes remove metal and that are holding the diamonds in place. Instead of stripping or bombing, magnetic tumbling uses a needle type of media which brightens the ring and reaches into every little crevice. It will not damage the diamonds and will achieve a bright burnished appearance in about twenty minutes without removing metal or using dangerous cyanide solutions.
To Summarize With The Important Points:
- 1) First and most importantly, ensure that models are produced with accurate channels or prongs dimensions and that grooves for the stones are very carefully cut into them.
- 2) Check waxes to determine that stones are being held tightly by the wax and supported by the investment.
- 3) Confirm that burnout ovens are hooked up with a proper exhaust system and are calibrated to show correct temperatures.
- 4) Confirm that melting and casting equipment has accurate temperature controls.
- 5) At all times try to be certain that you are using the coolest possible temperatures of flask and melted metal.
- 6) The stones which can be safely used today are Diamonds, CZ’s, Rubies, Sapphires and Garnets.
- 7) Prepare the models as if they were the castings and you were about to set the stones into them
 | |
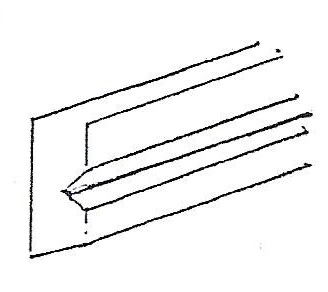 | Preparation for channel set of Baguette stones |
 |
Burnout For Diamonds In Wax
Investing is done in the same manner as usual. After flasks have set and dried for one hour, they are placed in a steam de-waxing cabinet. The flasks are allowed to be de-waxed for one hour. After one hour flasks are placed in a burnout oven that is preheated to -
Burnout Cycle:
1 Hour to climb from 250° up to 350°F
1 Hour to climb from 350° up to 450°F
1 Hour to climb from 450° up to 650°F
1 Hour to climb from 650° up to 850°F
Hold for 850° for six hours
After casting is done the flasks must be allowed to be cool to a temperature that is comfortable to be held by the bare hand before quenching.
By Bob Romanoff, President
Romanoff International Supply Corporation